Kez's
Koloring Tutankham...Tutorial. *cough*
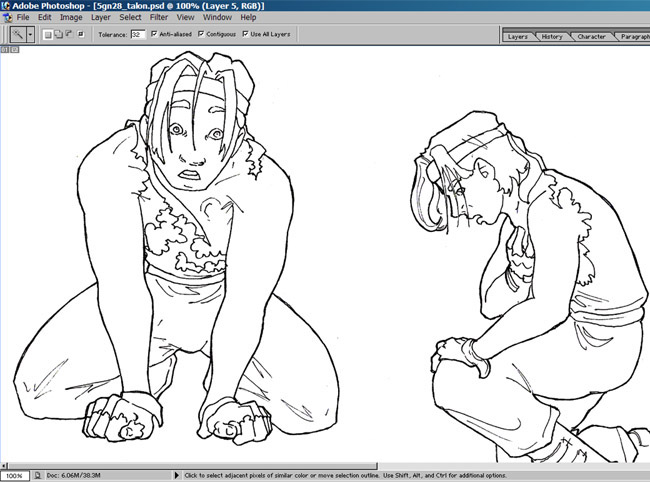
This
tutorial is about how I color. It's nothing special, but
some people have asked that I make one. The image I've
chosen to use for this tutorial can be found in Chapter
5 page 28, and is an example of my normal method of coloring
that I use for any normal page. This ain't fancy-schmancy
colorin' people. If you want that, I suggest you look
here,
here,
or here.
|
1)
Sketch to Ink:
I sketch and
ink on separate sheets of paper, NEVER on top of each
other. For this, I use a light table, bought at a craft
store for $25. Due to this wonderful investment (alright,
fine, so it was a birthday present), when I scan linework
it is usually very clean. I scan normal pages at 200dpi
RGB mode. Then in photoshop I up the contrast on the
scale to 40 and play with the Levels. If you want your
image to be print worthy, DO NOT SCAN AT LESS THAN 300
DPI.
As a comic artist
always trying to save time, I color all panels with
the same characters in it in the same file. Later on,
each panel becomes a separate file.
|
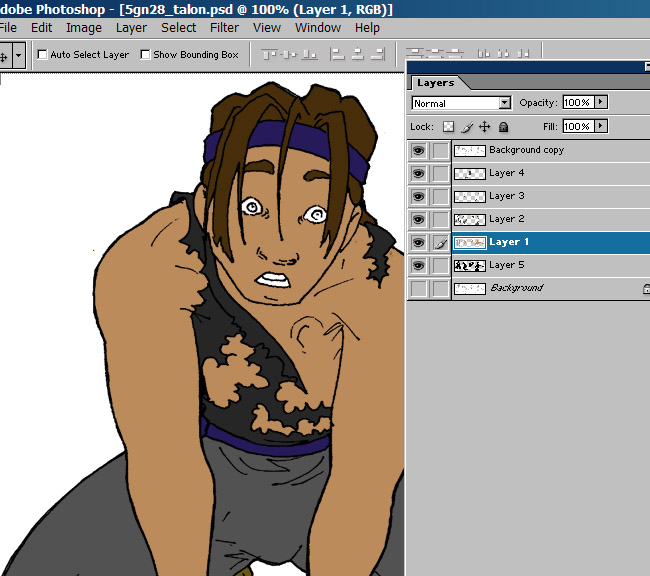
2)
Layering
Once the scan is
imported to Photoshop and then cleaned, I duplicate the
bottom layer and set it to multiply. Then, between the
two layers, I create a new, transparent layer. For those
n00bs reading this, DO NOT COLOR ON YOUR LINEWORK. Color
beneath it. That is why love photoshop,
because of layers. "Multiply" means that
anything white becomes transparent, so only the dark lines
will be visible in the final image. "Screen"
is the opposite of multiply, and it makes black transparent.
I urge you to experiment with these layer settings when
you have the time. You can get some really awesome effects.
|
3) Flats
In the middle transparent
layer I start putting in the flat colors. I use multiple
layers for flats because I don't want colors touching
each other. If all my flats are on the same layer, then
fixing mistakes is just that much harder. So, multiple
layers with two or three non-touching colors on each.
I select what I want using the magic wand tool, which
is beneath the top right button on your PS toolbar. Then,
I go to the menu and find select--modify--expand by 1
pixel. Then I fill using the paint bucket tool.
There is one more
very important step after filling. I create one more layer
beneath all the flats. Using the magic wand tool I select
the white AROUND the character. Then I go to the menu--select--inverse
and fill it with black. This means that all those annoying
white spaces you may have missed with the wand on the
colored layers get filled in. On this layer, I also color
back in the eyes and mouths white, but don't finish them
until later.
Next
|
|
|
The
War of Winds and all related ideas and concepts © copyright
Karen Howard, unless otherwise stated.
ALL RIGHTS RESERVED.
|
|